iOS 13 Checklist For Developers
A checklist to refer to when shipping your next app for iOS 13
iOS 13 has finally been rolled out to the public, closely followed by 13.1. I’m sure you’ll be shipping your next app updates with it, but first, let’s go through a checklist of essential things.
- The PencilKit Framework has released with iOS 13. It allows developers to easily integrate a drawing environment for hand-drawn content by taking input from an Apple Pencil or user’s fingers.
- On Device Speech Recognition using
SFSpeechRecognizerallows developers to do stuff like offline transcriptions, speech analysis and much more. This would certainly boost Voice-based AI applications. - The SwiftUI framework has grabbed the most eyeballs this year. It lets you build cool and innovative user interfaces in a completely different way. You must be aware of this unless you’ve been living under a rock.
- Combine is a Reactive Programming Framework.
- RealityKit framework is used to simulate and render 3D content easily. Build even better AR apps!
- Project Catalyst allows us to easily port iOS apps to macOS. Just tick the checkbox to add macOS as a target. This should work in Mac OS 10.15 and above.
Moving on from the popular frameworks that are making noise these days, let’s dig into the important updates.
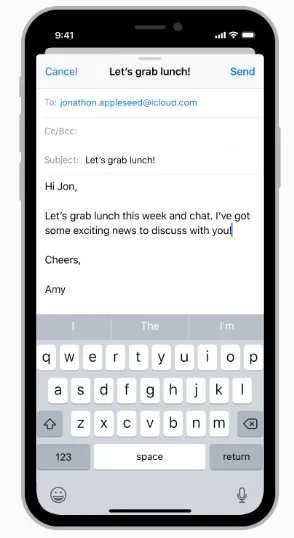
View Controller Default Presentation Style
With iOS 13, Apple has changed the default presentation style of View Controllers to a modal sheet from fullscreen in iOS 12. A modal sheet is a card like a form sheet which can be dismissed by pulling it down. This can break your app’s flow if you don’t intend to shut view controllers in this way.
I want full-screen view controllers
Starting iOS 13, you’ll need to explicitly specify the presentation style if you want full screen as shown below:
vc.modalPresentationStyle = .fullScreen

let navigationController = UINavigationController(rootViewController: vc) navigationController.modalPresentationStyle = .fullScreen present(vc, animated: true)
To prevent the pull to dismiss gesture, add the following line of code:
vc.isModalInPresentation = true
You can even take more control over the swipe to dismiss on the modal sheets by using the newly added functions in IAdaptivePresentationControllerDelegate protocol:
presentationControllerDidAttemptToDismissis called whenisModalInPresentationis true and the user is still trying to dismiss by swiping down.presentationControllerWillDismisscan be triggered when a user tries swiping the view controller up and down.presentationControllerDidDismisspresentationControllerShouldDismiss
UINavigationBar Large Title Style Changes
Starting in iOS 13, UINavigationBar for large title style is no longer translucent. It’s now transparent.
We can change the style back to translucent like this:
let appearance = UINavigationBarAppearance()
appearance.configureWithDefaultBackground()
UINavigationBar.appearance().scrollEdgeAppearance = appearance
UINavigationBarAppearance is the new class to customize the appearance.
UINavigationBar consists of three built-in appearance types:
standardAppearancecompactAppearancescrollEdgeAppearancefor a large title navigation bar.
Revamped UISegmentedControl
The new UISegmentedControl has a 3d effect. But more importantly, tintColor property no longer works in iOS 13. Instead, we need to use selectedSegmentTintColor to change the background color of the selected segments.

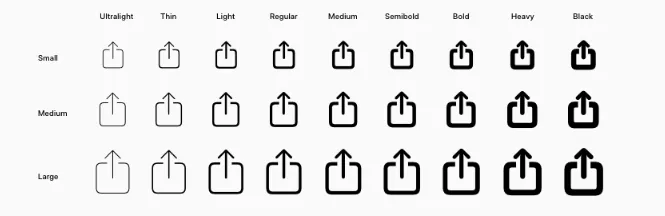
SF Symbols
Starting iOS 13, UIImage has got a new initializer, systemName. You can pass the system name as a string by looking up in the SF Symbols mac application, which contains more than 1000 system icons. You can download it here.
UIImage(systemName: trash.fill)
SceneDelegate For Multi-Window Support
iPadOS brings multi-window support in the same app. Now when you create a new Xcode you’ll see a SceneDelegate file. This is for managing individual scenes (windows). So the AppDelegate’s UI related responsibilities are now taken over by SceneDelegate.
Lifecycle methods like applicationDidBecomeActive in the AppDelegate no longer work. Instead, SceneDelegate methods likesceneDidBecomeActive gets triggered now.
To get back the old behavior, remove the
Application Scene Manifestentry frominfo.plistfile and add the window property back in theAppDelegate.
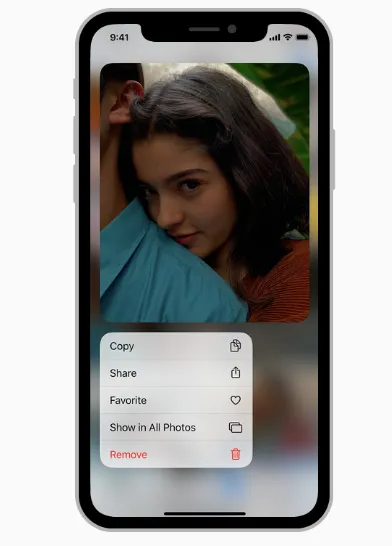
New Context Menus
Context Menus are a replacement for the Peek and Pop which worked on devices with 3D touch only.
Context menus, on the other hand, work on all devices. We can set menus, submenus as well as Preview the Target View Controller.
The menu is visible just above or below the preview.
To implement a context menu on collection/table view there’s a newly added function in the delegate that you need to override.
For collection view it is:
func collectionView(\_ collectionView: UICollectionView,
contextMenuConfigurationForItemAt indexPath: IndexPath, point: CGPoint) -> UIContextMenuConfiguration?
We can define our own UIMenu and assign actions to them.
To open the target view controller from the preview we need to implement the method:
func collectionView(\_ collectionView: UICollectionView,
willPerformPreviewActionForMenuWith configuration: UIContextMenuConfiguration,
animator: UIContextMenuInteractionCommitAnimating)
Dark Mode And Dynamic Colors
We can customize the user interface to dark mode in iOS 13 using the userInterfaceStyle property, part of traitCollection.
Dynamic colors are now available and they can be adopted for dark or light mode. We can even assign our own set of color or dynamic image for lightAppearance and darkAppearance.
In order to opt-out of dark mode or lock the appearance to just one type we set the UIUserInterfaceStyle to Light/Dark in the info.plist file.
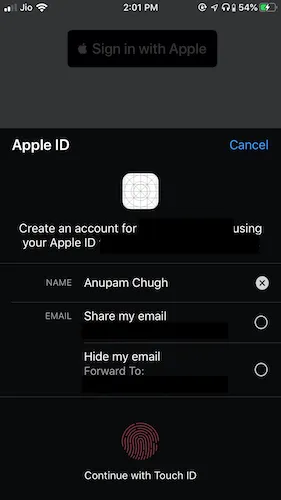
Sign In With Apple
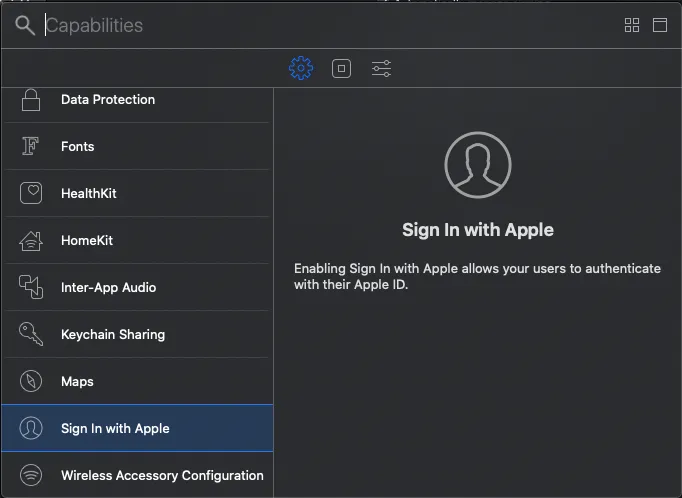
Starting iOS 13, we can integrate Sign In With Apple button in our applications. It’s a secure and easy way to sign in and requires only the username and email address.
Moreover, the user can choose to hide their email address in the app.
To add a Sign In With Apple button in your app, just import AuthenticationServices and add the following code in your ViewController:
let button = ASAuthorizationAppleIDButton()
button.addTarget(self, action: #selector(handleAuthorization), for: .touchUpInside)
self.view.addSubview(button)
You can then handle the authorization and verification part on the button click. Please note that this requires Xcode 11.
Vision API Gets a Core ML Boost
The Vision API gets a boost by the inclusion of the Document Camera View Controller. Optical Character Recognition is much easier now thanks to the improved machine learning model. Moreover, Vision API now comes up with a Pet Animal Classifier. Yes, you don’t need a Core ML model for detecting a cat or a dog! Just use VNRecognizeAnimalRequest which is a part of VNImageRequest.
Did you know?
Files App on iOS 13 now has a built-in PDF Scanner. Earlier only the notes app had this. It uses the upgraded Vision API with Document Camera Controller Delegate.
Core ML 3 On Device Personalisation

On Device Training Of Models is a key development in Core ML this year. Now you can train ML Models on the device itself.
Typically, this is used for updating the model for specific use cases. An updatable Core ML model is built using coremltools 3.0 and above.
There are significant updates to the NLP frameworks such as word embedding and much more in Core ML 3 this year.
That sums up most of the important points of iOS 13.