Core ML 3 On-Device Retraining - Hands-On
Long story short:
It’s me, a Core ML model, and I’m intentionally trained to detect a few cats as dogs and vice versa. Let’s see if I can be re-trained on device to detect the images correctly.
The tutorial below accomplishes two things:
- Creates an updatable Core ML 3 model.
- Demonstrates how to retrain a Core ML model on your iPhone.
Core ML got a big boost this year with the Core ML 3 update during WWDC 2019. Among the many improvements, On-Device Learning stands out.
Though it’s fancy to do an on-device model training, it isn’t feasible given the long duration it’ll take for the model to train on iOS devices. At best, it’s recommended to retrain a model on the device, personalised for the user.
Before we go down the implementation road, let’s admire the other updates Core ML 3 has in store for us.
What’s New in Core ML 3
- 70 new neural network layers — New layers allow more complex neural network models to be converted to Core ML without the need of writing custom layers
- Variety of new models — Models such as the
KNNclassifier,ItemSimilarityRecommender,SoundAnalysisPreprocessing,WordEmbedding, andLinked Modelswill just help us to solve more machine-learning problems. - Core ML API has more abstraction — You need not convert images to
CVPixelBufferfor CNN models anymore.MLFeatureValuedoes that for you automatically. - ML Model Configuration — We can now configure the ML Model as per our needs. Test setting the model to run on CPU, GPU, and/or neural engine by assigning the respective
MLComputeUnitsproperty. - On-Device Learning — Now you can easily train/retrain your models on the device itself. No need to recompile it from your machine.
Linked Models allow reusability across models. So if two models are using another model, that model would now be loaded just once.
Let’s Deep Dive Into the Code Now
We’ll first be creating a Keras vs. Image Classifier CNN model using categorical cross-entropy loss function.
If you directly want to jump onto the Core ML part, skip the next section.
Creating a Keras Image Classifier Model
The model is compiled with the categorical cross-entropy loss function since currently it is the only CNN-loss layer that is updatable in Core ML 3.
We ran the above model for five epochs and got an accuracy of around 73%, which is pretty decent.
Now that we’ve got our Keras model, all that is left is converting it into an updatable Core ML model.
Creating an Updatable Core ML Model
To create an updatable model, we need to set the isUpdatable flag on the model and some neural network layers.
Besides that, we need to define the training inputs, loss function, optimizers, and other parameters like epochs and batch size on our Core ML model.
We need to update coremltools to 3.0. At the time of writing, the beta 6 release was the latest. Just use the pip install coremltools==3.0b6 command to install it.
Converting Keras to Core ML model
Here’s the script to do that:
import coremltools

output_labels = ['Cat', 'Dog']
coreml_model = coremltools.converters.keras.convert('model.h5', input_names=['image'], output_names=['output'],
                                                   class_labels=output_labels,
                                                   image_input_names='image')

coreml_model.author = 'Anupam Chugh'
coreml_model.short_description = 'Cat Dog Classifier converted from a Keras model'
coreml_model.input_description['image'] = 'Takes as input an image'
coreml_model.output_description['output'] = 'Prediction as cat or dog'
coreml_model.output_description['classLabel'] = 'Returns Cat Or Dog as class label'


coreml_model.save('catdogclassifier.mlmodel')
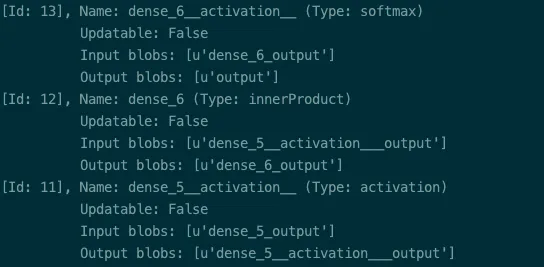
Inspecting the neural network layers
First, load the specs from the existing Core ML model into a NeuralNetworkBuilder:
coreml_model_path = "./catdogclassifier.mlmodel"

spec = coremltools.utils.load_spec(coreml_model_path)
builder = coremltools.models.neural_network.NeuralNetworkBuilder(spec=spec)
builder.inspect_layers(last=3)
builder.inspect_input_features()
By inspecting the layers, we can determine the dense_layers that need to made updatable.
Along with that, we need to set the input parameters for the training input for on-device training:
neuralnetwork_spec = builder.spec

neuralnetwork_spec.description.input[0].type.imageType.width = 150
neuralnetwork_spec.description.input[0].type.imageType.height = 150

neuralnetwork_spec.description.metadata.author = 'Anupam Chugh'
neuralnetwork_spec.description.metadata.license = 'MIT'
neuralnetwork_spec.description.metadata.shortDescription = (
        'Cat Dog Classifier converted from a Keras model')
Specifying updatable layers, loss functions, and optimisers
Now, we need to set the last two dense layers as updatable and set the loss-function input. The loss-function input is the output value from the softmax activation layer (‘output’ in our case):
model_spec = builder.spec
builder.make_updatable(['dense_5', 'dense_6'])
builder.set_categorical_cross_entropy_loss(name='lossLayer', input='output')

from coremltools.models.neural_network import SgdParams
builder.set_sgd_optimizer(SgdParams(lr=0.01, batch=5))
builder.set_epochs(2)
The make_updatable method is used to make a layer updatable.
It requires a list of layer names. The layers are dense_5 and dense_6 in our case, available from neural network builder properties.
Specifying training-input descriptions
Now we just need to set the training-input description and save our specifications in a new model as shown below:
model_spec.isUpdatable = True
model_spec.specificationVersion = coremltools._MINIMUM_UPDATABLE_SPEC_VERSION

model_spec.description.trainingInput[0].shortDescription = 'Image for training and updating the model'
model_spec.description.trainingInput[1].shortDescription = 'Set the value as Cat or Dog and update the model'
The specificationVersion property is important since it ensures the correct version number is used for the mlmodel.
Core ML 3 is version 4, so the above updatable model works on version 4 and above only.
Generating updatable model
Now that we’ve specified all the model specifications, we can generate our model, which is updatable on the device using the following line of code:
coremltools.utils.save_spec(model_spec, “CatDogUpdatable.mlmodel”)
Our updatable Core ML model is now ready to use. Let’s import it into an Xcode project. You shall see a model description similar to the one in the image below:
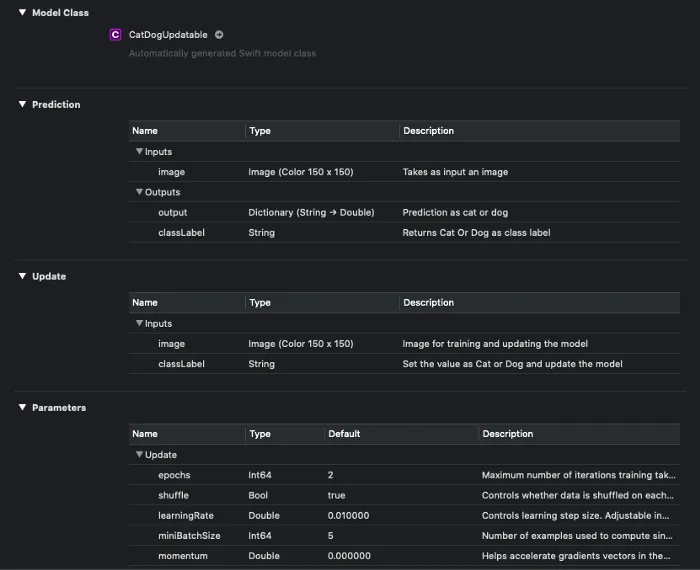
It’s clear from the image above that two new sections, Update and Properties, are added with Core ML 3. The Update section consists of the input descriptions for training the input.
Our above classifier model has two outputs: the label for the predicted class and a dictionary that has the confidence for all (both) of the classes.
In the next section, we’ll deploy the updatable model we’ve just built, in an iOS application.
Train a Core ML Model on Your Device
To get started, here’s our plan of action:
- Retrain a cat vs. dog classifier Core ML model on a device by correctly labelling the wrongly predicted images.
- Train the batch of relabelled images on the device itself with our updatable model.
- Save the new updated Model in the application’s document directory on your device and it’ll be used for future predictions or retraining.
Final Destination
An image is worth a thousand words (and a GIF is composed of thousands of images!)
Here’s the final outcome you’ll get by the end of this article:

As you can see in the screengrab, we allow retraining predicted images with the inverse label.
Relabelling and retraining the model doesn’t always guarantee a different prediction.
Now that we know our final result, let’s begin the journey of training your ML model on a device. Before we dive into code, let’s get a hang of the Core ML classes and API we’ll be using.
A Brief Look Into the Core ML API
MLModel is the class that encapsulates the model.
We will be discussing the following important classes and protocols in the next sections:
MLFeatureValueMLImageConstraintsMLFeatureProviderMLBatchProviderMLUpdateTask
MLFeatureValue
MLFeatureValue acts as a wrapper for the data. The Core ML model accepts the inputs and outputs in the form of MLFeatureValue.
MLFeatureValue lets us directly use a CGImage. Along with that, we can pass the image constraints for the model. It creates the CVPixelBuffer from the CGImage for you, thereby avoiding the need to write helper methods.
The following piece of code creates an MLFeatureValue instance from an image.
let featureValue = try MLFeatureValue(cgImage: image.cgImage!, constraint: imageConstraint, options: nil)
Now let’s look into MLImageConstraints.
MLImageConstraints
MLImageConstraints is responsible for feeding the correct size of the input image to the model. It contains the input information. In our case, that is the image size and image format.
We can easily retrieve the image constraint object from the model using the following piece of code:
let imageConstraint = model?.modelDescription.inputDescriptionsByName["image"]!.imageConstraint!
We just need to pass the input name (“image”, in our case) to the model description.
MLFeatureProvider
An MLFeatureValue is not directly passed into the model. It needs to be wrapped inside the MLFeatureProvider.
If you inspect the mlmodel Swift file, the model implements the MLFeatureProvider protocol. To access the MLFeatureValue from MLFeatureProvider, there is a featureValue accessor method.
MLDictionaryFeatureProvider is a convenience wrapper that holds the data in a dictionary format. It requires the input name ("image", in our case) as the key and MLFeatureValue as the value.
If there are more than inputs, just add them in the same dictionary.
MLBatchProvider
This holds a collection of MLFeatureProviders for batch processing.
We can hence predict multiple feature providers or train a batch of training inputs encapsulated in the MLBatchProvider. In this article, we’ll be doing the latter.
An MLArrayBatchProviders contains an array of batch providers.
MLUpdateTask
An MLUpdateTask is responsible for updating the model with the new training inputs.
Required parameters
- Model URL — The location of the compiled model (
mlmodelcextension). - Training data —
MLArrayBatchProviders. - Model configuration — Here we pass
MLModelConfiguration. We can use the existing model’s configuration or customize it. For example, we can force the model to run on the CPU and/or GPU and/or neural engine. - Completion handler — It returns the
contextfrom which we can access the updated model. Then we can write the model back to the documents directory.
Optional parameters
progressHandlers— Here you passMLUpdateProgressHandlerswith the array of events you want to listen to, such as epoch start/end, training start/end.progressHandler— This gets called whenever any of the events defined in the first case gets triggered.
To start the training, just call the resume() function on the updateTask instance.
Here’s a look at a pseudo code for training the data on a device:
let updateTask = try MLUpdateTask(forModelAt: updatableModelURL, trainingData: trainingData, configuration: model.configuration, completionHandler: { context in

}

updateTask.resume()
Now that we’ve got an idea of the different components and their roles, let’s build our iOS application that trains the model on the device.
Code
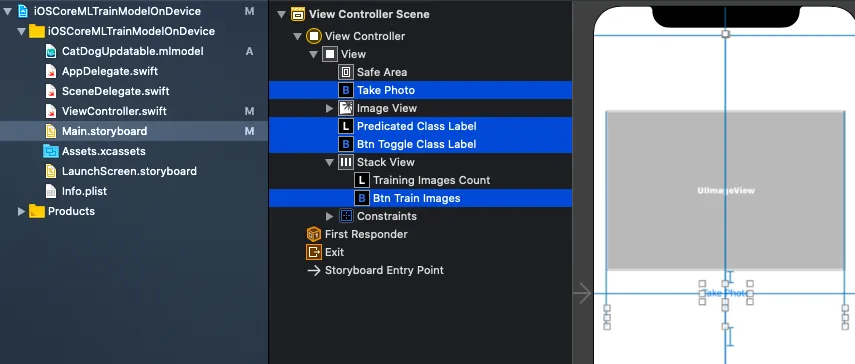
Our storyboard
Load a model from a URL
First, let’s try to load our mlmodel into the documents directory on a separate URL:
private func loadModel(url: URL) -> MLModel? {
      do {
        let config = MLModelConfiguration()
        config.computeUnits = .all
        return try MLModel(contentsOf: url, configuration: config)
      } catch {
        print("Error loading model: \\(error)")
        return nil
      }
}

let modelURL = Bundle.main.url(forResource: "CatDogUpdatable", withExtension: "mlmodelc")
let updatableModel = loadModel(url: modelURL)
Predict an image using MLModel
Now that we’ve got our MLModel from the URL, we’ll run the prediction code, assuming we’ve got the image from the ImagePickerController:
func predict(image: UIImage) -> Animal? {
        let imageConstraint = model.modelDescription.inputDescriptionsByName["image"]!.imageConstraint!

        do{

            let imageOptions: [MLFeatureValue.ImageOption: Any] = [
                .cropAndScale: VNImageCropAndScaleOption.scaleFill.rawValue
            ]

            let featureValue = try MLFeatureValue(cgImage: image.cgImage!, constraint: imageConstraint, options: imageOptions)
            let featureProviderDict = try MLDictionaryFeatureProvider(dictionary: ["image" : featureValue])
            let prediction = try updatableModel?.prediction(from: featureProviderDict)
            let value = prediction?.featureValue(for: "classLabel")?.stringValue
            if value == "Dog"{
                return .dog
            }
            else{
                return .cat
            }
        }catch(let error){
            print("error is \(error.localizedDescription)")
        }
        return nil
}
We just pass in the UIImage as a CGImage to the MLFeatureValue with the MLImageConstraints of the model input and MLDictionaryFeatureProvider runs the prediction on the MLModel.
featureValue returns a set of featureNames. classLabel, in our case, contains the label cat or dog.
We have a lookup dictionary of UIImage and Label, termed as imageLabelDictionary. If we want to add an image to the training input, we set the image and the inverse of the predicted output (cat/dog) in the dictionary.
Next, we create a batch provider out of the imageLabelDictionary.
Create a batch provider
Our batch provider creates an MLArrayBatchProvider out of the TrainingInput instances which require the image as a CVPixelBuffer and the classLabel as either cat or dog.
private func batchProvider() -> MLArrayBatchProvider
    {
var batchInputs: [MLFeatureProvider] = []
        let imageOptions: [MLFeatureValue.ImageOption: Any] = [
          .cropAndScale: VNImageCropAndScaleOption.scaleFill.rawValue
        ]
        for (image,label) in imageLabelDictionary {

            do{
                let featureValue = try MLFeatureValue(cgImage: image.cgImage!, constraint: imageConstraint, options: imageOptions)

                if let pixelBuffer = featureValue.imageBufferValue{
                    let x = CatDogUpdatableTrainingInput(image: pixelBuffer, classLabel: label)
                    batchInputs.append(x)
                }
            }
            catch(let error){
                print("error description is \(error.localizedDescription)")
            }
        }
     return MLArrayBatchProvider(array: batchInputs)
}
Thanks to MLFeatureValue, we can easily retrieve the pixelBuffer from the featureValue function.
Retrieve URL of the MLModel
We need to pass the model URL to MLUpdateTask. For that, we need to retrieve the URL from the application’s documents directory. We need to use the FileManager.
The code is straightforward:
let fileManager = FileManager.default
let documentDirectory = try fileManager.url(for: .documentDirectory, in: .userDomainMask, appropriateFor:nil, create:true)

let modelURL = documentDirectory.appendingPathComponent("CatDog.mlmodelc")
Now we are ready to train our model again with the new images:
finalContext.model.write(to: fileURL) overwrites the model present at the URL in the documents directory. This Core ML model was set to run one epoch only.
Full Source Code
That concludes the Core ML on-device training. The full source code below merges all the above concepts into a workable iOS Application. Along with that the models and Python scripts are available in the GitHub repository.