NSFW Image Classifier Using Create ML, Core ML, and Vision in a SwiftUI App
Let’s blur out SwiftUI images with sensitive content
With the advent of machine learning on devices, the opportunities that are emerging to make smartphones smarter than ever are endless.
From the health segment to arts and security, using machine learning directly on our device is leaving a profound impact on many industries and is opening endless possibilities for more.
Apple, through Create ML, provides an easy-to-use machine learning framework with a familiar drag and drop/playground-like interface. The speed at which you can train and evaluate your models is incredible.
By using Create ML, we can harness ready-to-use model templates (text, images, recommenders, etc.) and deploy the Core ML models in our iOS applications.
In this article, we’ll be creating an image classifier Create ML model that identifies if the image is NSFW or not.
Our Goal
- Training a Create ML image classifier using the appropriate Kaggle dataset. Subsequently, we’ll ship the Core ML model into our Xcode project.
- Using the Vision framework to drive the Core ML model in a SwiftUI based application. Images inferred as NSFW will be blurred out.
Training a Create ML Image Classifier Model
Launch the Create ML application that comes with Xcode and choose the image classifier template for this article. Create ML’s image classifier uses transfer learning to speed up the training time.
An image classifier model requires an input image and responds with the predicted label as the output. For training such classifiers, we need to pass a set of already labeled images.
We’ve used a dataset from Kaggle for training our image classifier model. By following the standard data science rule, split the dataset into 80-20 train and test folders.
Our training and the testing dataset are grouped into two folders: SFW and NSFW, containing the respective images.
Create ML’s image classifier allows us to augment our dataset by flipping, blurring, rotating, and adding noise to the dataset of images. Data augmentation brings diversity to the dataset by expanding the current dataset with modified versions of some images.
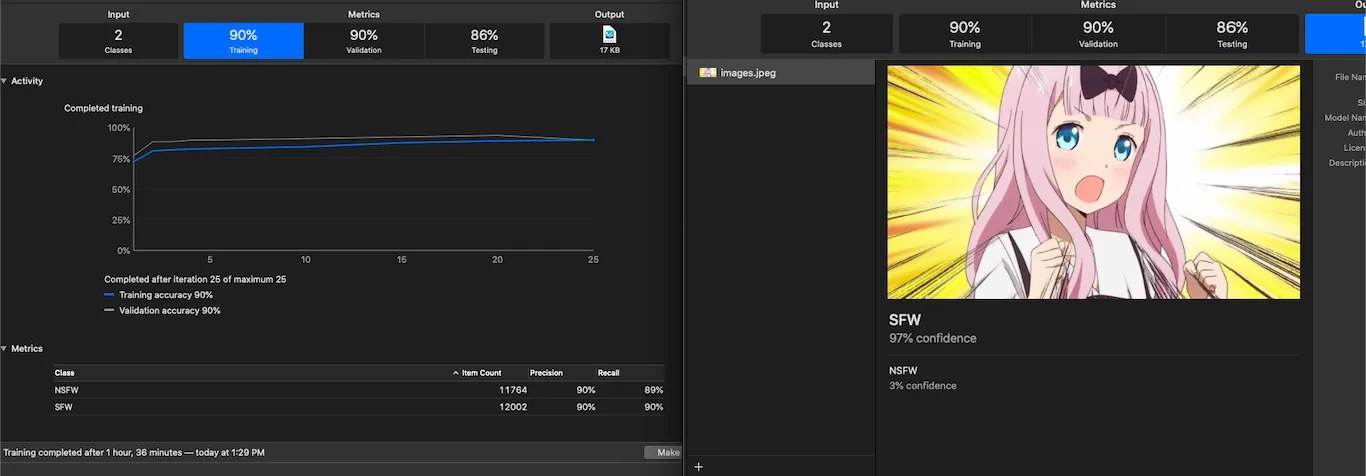
Following is a glimpse of the Create ML application after the training was completed:
Alternatively, we can use the MLImageClassifier class to programmatically generate our Core ML models in a macOS Xcode playground.
CreateMLUI has the ability to display live previews and results. The [MLClassifierMetrics](https://developer.apple.com/documentation/createml/mlclassifiermetrics) contains the metrics for assessing the model’s training and validation accuracy.
Using Core ML Model in a SwiftUI-Based Application
Next, we’ll deploy the Core ML model generated above in a SwiftUI-based application. We’ll run the model of a bunch of images presented in the SwiftUI list and, accordingly, blur the ones that are predicted as NSFW.
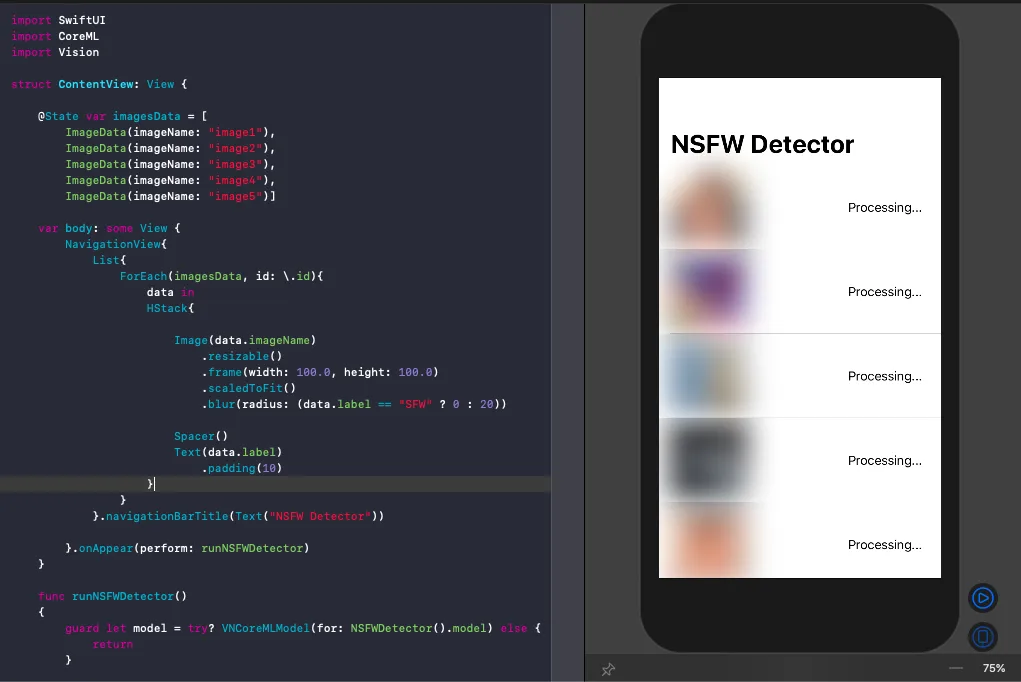
The following code showcases the ContentView body of our SwiftUI application:
A blur radius is set on the image by default unless the model predicts it as safe. The larger the radius the more blurred the image.
The data for each row of the SwiftUI list needs to be conformed to the Identifiable protocol in order for them to have a unique identity with respect to the others:
struct ImageData : Identifiable{

public let id = UUID()
public var imageName : String
public var label : String = "Processing..."

}
The Vision framework takes care of resizing the input image to the Core ML model constraints and driving the Core ML model to achieve the desired output.
The Core ML model is wrapped in the VNCoreMLModel in the following way:
let model = try? VNCoreMLModel(for: NSFWDetector().model)
The Vision request would return observations of the type VNClassificationObservation in our case, since this is a Classifier model.
Running the Vision Request
The following code iterates over each of the images and performs the Vision request on the CIImage. As a result, it returns the label in the identifier property:
func runNSFWDetector(){

    guard let model = try? VNCoreMLModel(for:  NSFWDetector().model) else { return }
    for i in 0..<imagesData.count{
        guard let image = UIImage(named: imagesData[i].imageName)
        else{continue}
        guard let ciImage = CIImage(image: image)
        else{continue}
        let request = VNCoreMLRequest(model: model) { request, error in
            let results = request.results?.first as? VNClassificationObservation
            self.imagesData[i].label = results?.identifier ?? "Error"
        }
        let handler = VNImageRequestHandler(ciImage: ciImage)
        DispatchQueue.global(qos: .userInteractive).async {
            do {
                try handler.perform([request])
            } catch {
                print(error)
            }
        }
    }
}
The Vision requests run asynchronously so that the main thread isn’t blocked and the results are returned in the completion handler.
Subsequently, we update the labels in the ImageData structure, thereby triggering the SwiftUI body to be rendered again with the changes.
As a result, we get the following outcome of our application in the live preview:
The images predicted as SFW are displayed and the rest is blurred.
Conclusion
We saw how easy it is to train an image classifier model using Create ML and subsequently deploy the Core ML model in an application.
Finally, we ran our inferences on the images by leveraging the Vision framework to determine if the image has NSFW contents or not. SwiftUI allows us to build views from scratch very quickly.
The full source code of this article is available in my GitHub repository.