Pull to Refresh in SwiftUI [iOS 13 Workaround]
Leverage the UIViewRepresentable and UIHostingController to embed the refresh controls in your SwiftUI views
Update: As of iOS 15, we now have a refreshable modifier that can be attached to a list to enable the pull-to-refresh action.
We’re almost at the halfway stage with regards to the annual WWDC conferences (2019 and 2020 being six months away each, at the time of writing) and despite the euphoria that the introduction of SwiftUI created in the iOS community, we still can’t let go of the UIKit framework.
There are a lot of features that are absent in SwiftUI currently which makes UIKit indispensable right now.
Among the features that aren’t included in SwiftUI API yet, which are so many, activity indicator and pull to refresh are two features that are missed the most.
Almost every application needs a swipe-down to refresh the view and an activity indicator for displaying progress while the content loads.
Gladly, we have the support of a UIViewRepresentable protocol to embed UIViews in SwiftUI and a UIHostingController class for adding SwiftUI views to the UIViewController.
With the help of the smooth interoperability between UIKit and SwiftUI, we can come up with our own custom implementations of some of the missing SwiftUI implementations and that’s the idea behind this article.
Our Goal
- Adding a pull-to-refresh view on the SwiftUI List in our iOS application.
- We’ll be using
UIHostingControllerandUIViewRepresentableto allow embedding SwiftUI child views in aUIScrollView(of the UIKit) with aUIRefreshControl. - Leveraging
GeometryReaderto get a hold of the view’s dimensions.
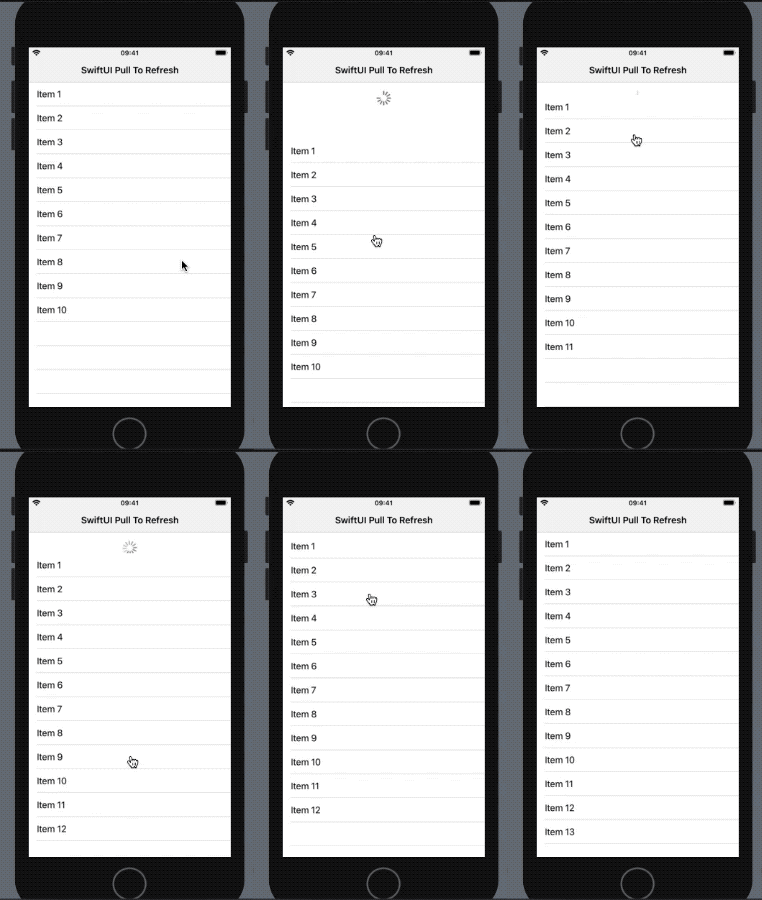
Final Destination
The following illustration showcases what we’ll achieve by the end of this piece:

Setting Up Our Data Model
To start off, let’s create a structure that holds a unique ID and a text. The structure needs to conform to the Identifiable protocol to allow SwiftUI Lists to identify each row element independently of the others.
struct Model: Identifiable {

var id = UUID()
var title: String

}
Next, let’s create a class that conforms to the ObservableProtocol that’ll allow us to announce changes in our model so that it updates the SwiftUI view’s body automatically.
class DataModel: ObservableObject {
    @Published var modelData: [Model]

    init(modelData: [Model]) {
        self.modelData = modelData
    }

    func addElement(){
        modelData.append(Model(title: "Item \(modelData.count + 1)"))
    }
}
The shuffleList would be triggered every time a pull-to-refresh action is performed on the List.
Creating a SwiftUI Child View
Let’s create a child SwiftUI view which holds a List. This view will eventually be embedded in a ScrollView with the pull-to-refresh controls.
struct SwiftUIList: View {

    @ObservedObject var model: DataModel
	 var body: some View {
        List(model.modelData){
            model in
            Text(model.title)
        }
    }
}
The ObservedObject property wrapper updates the List of elements whenever the Published property from the DataModel is changed.
SwiftUI and UIKit Interoperability
Neither the List nor the ScrollView of SwiftUI possesses the ability to add a RefreshControl view at present.
So, let’s fall back onto the classic UIScrollView from UIKit. We’ll dress it up inside a struct that conforms to the UIViewRepresentable protocol.
struct CustomScrollView : UIViewRepresentable {

    var width : CGFloat
    var height : CGFloat

    let modelData = DataModel(modelData: [Model(title: "Item 1"), Model(title: "Item 2"), Model(title: "Item 3")])

    func makeCoordinator() -> Coordinator {
        Coordinator(self, model: modelData)
    }
    func makeUIView(context: Context) -> UIScrollView {
        let control = UIScrollView()
        control.refreshControl = UIRefreshControl()
        control.refreshControl?.addTarget(context.coordinator, action:
                                            #selector(Coordinator.handleRefreshControl),
                                          for: .valueChanged)
        let childView = UIHostingController(rootView: SwiftUIList(model: modelData))
        childView.view.frame = CGRect(x: 0, y: 0, width: width, height: height)

        control.addSubview(childView.view)
        return control
    }
    func updateUIView(_ uiView: UIScrollView, context: Context) {}
    class Coordinator: NSObject {
        var control: CustomScrollView
        var model : DataModel
        init(_ control: CustomScrollView, model: DataModel) {
            self.control = control
            self.model = model
        }
        @objc func handleRefreshControl(sender: UIRefreshControl) {
            sender.endRefreshing()
            model.addElement()
        }
    }
}
In the above code, we’re doing quite a few things. Let’s jot them down.
- Adding the
UIRefreshControlto aUIScrollViewand listening to the value changes to know the state of the pull-to-refresh control. - The Coordinator class acts as the delegate for the UIKit view we’ve created in the
makeUIViewfunction. It responds to the user events on the refresh control and appends a new element to theDataModelonce the refresh is done. SwiftUIListis the custom SwiftUI view we’ve created that holds theDataModelin a List. Using theUIHostingController, we embed theSwiftUIListas a childUIViewof theUIScrollView.
The width and height properties you’re seeing in bold are required to set the dimensions of the child UIView. We’ll get these using a GeometryReader as we shall see next.
Build ContentView, Use GeometryReader
Finally, we’ll add the CustomScrollView SwiftUI view inside our ContentView’s body and pass the width and height using GeometryReader — a container view that defines its content as a function of its own size.
struct ContentView: View {

    var body: some View {
        GeometryReader{
        geometry in
        NavigationView{

                CustomScrollView(width: geometry.size.width, height: geometry.size.height)
                    .navigationBarTitle(Text("SwiftUI Pull To Refresh"))
            }
        }
    }

}
Conclusion
To sum up, we created a quick pull-to-refresh implementation to use in our SwiftUI views by leveraging the UIHostingController for transforming a SwiftUI to a UIKit view and a UIViewRepresentable for converting a UIKit view to SwiftUI.
A major SwiftUI upgrade that can be easily used in production applications is on everyone’s WWDC 2020 wishlist.
You can find the full source code of the above iOS application in my GitHub Repository.